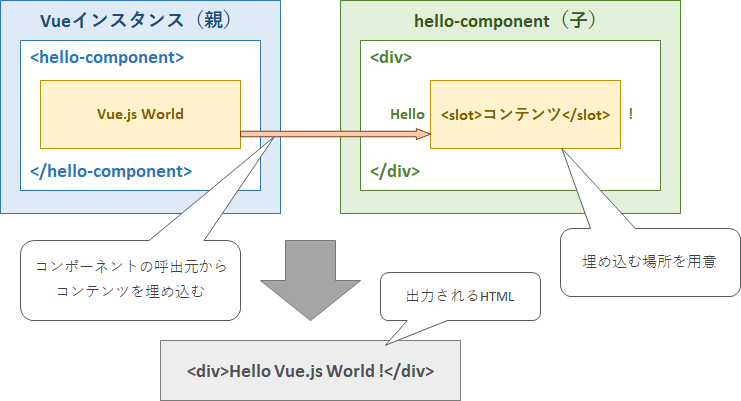
コンポーネントを作成していると、コンポーネント側の実装時点では配置できない要素などを利用する側から差し込みたい場合があります。
例えば、コンポーネント内に配置されたテキストを表示する領域に、コンポーネントを利用する側のコンポーネントやアプリケーションから文字列を埋め込みたい場合などです。

Vue.jsでは上記のように、子コンポーネントに配置されている要素の内部に親コンポーネントからコンテンツを埋め込むために「slot(スロット)」という機能が用意されています。
本記事では、コンポーネントにコンテンツを埋め込むslot要素について紹介します。
slot要素
slot要素は子コンポーネント側で使用します。
子コンポーネント側のHTMLテンプレートに以下のようにslot要素を配置します。
slot要素の書式
ここでは、div要素を配置した内部にslot要素を配置しています。
|
1 2 3 |
<div> <slot>ここにコンテンツを埋め込む</slot> </div> |
上記のslot要素内の「ここにコンテンツを埋め込む」の部分に、親コンポーネント側からコンテンツを埋め込むことができます。
親コンポーネント側では子コンポーネントのカスタム要素を配置し、その内部にコンポーネントに挿入するコンテンツを配置します。
|
1 2 3 |
<custom-div> 親コンポーネントから埋め込むコンテンツ </custom-div> |
上記の例では、スロットを配置した「custom-div」という名前の子コンポーネントにコンテンツ(「親コンポーネントから埋め込むコンテンツ」)を埋め込んでいます。
slot要素の使用例
以下にslot要素を使用した子コンポーネントと、コンポーネントを利用する親アプリケーション(Vueインスタンス)の実装例を示します。
HTML
|
1 2 3 4 5 6 7 8 9 10 11 12 13 14 15 16 17 18 |
<!-- 子コンポーネント --> <script type="text/x-template" id="hello-sheet"> <div> Hello <slot>親コンポーネントから埋め込むコンテンツ</slot> ! </div> </script> <!-- 親アプリケーション --> <div id="app"> <hello-component v-bind:button-text="buttonCaption" v-on:button-click="buttonClick"> {{insertText}} </hello-component> <button v-on:click="onClick"> 挿入するコンテンツを指定するボタン </button> </div> |
JavaScript
|
1 2 3 4 5 6 7 8 9 10 11 12 13 14 15 16 17 18 19 20 21 |
// 子コンポーネント const helloComponent = { template: '#hello-sheet' } // 親アプリケーション Vue.createApp({ components: { 'hello-component': helloComponent }, data: function() { return { insertText: 'Vue.js World' } }, methods: { onClick: function(e) { this.insertText = window.prompt('コンポーネントに挿入するテキストを入力してください。'); } } }).mount('#app') |
上記の例では、子コンポーネント側にコンテンツ挿入するためのslot要素を配置し、親のアプリケーションから文字列(テキスト)を挿入しています。
親アプリケーション側ではボタンがクリックされた時に入力ダイアログボックスを表示して、子コンポーネントのslotに埋め込む文字列を変更できるようにしています。

子コンポーネントに配置されたslot要素の内部に配置する文字列やHTML要素は、親コンポーネントからコンテンツが挿入されなければ初期値として表示されます。
上記の例の親アプリケーションのHTMLの
|
1 2 3 4 |
<hello-component v-bind:button-text="buttonCaption" v-on:button-click="buttonClick"> {{insertText}} </hello-component> |
の部分を
|
1 2 3 |
<hello-component v-bind:button-text="buttonCaption" v-on:button-click="buttonClick"> </hello-component> |
に変更({{insertText}}の記述を削除)すると出力されるHTMLは以下のようになります。
親コンポーネントからslot要素にコンテンツが差し込まれたら、子コンポーネントに記述された初期値は上書きされ、親コンポーネントから指定したコンテンツに置き換わる仕組みになっています。
上記の例では、子コンポーネントのslot要素内に文字列を埋め込んでいますが、slot要素で埋め込むコンテンツは文字列以外にHTML要素や他のコンポーネントなどの任意のテンプレートコードを挿入することもできます。
以下にコンポーネントのスロットに要素を埋め込む例を示します。
HTML
|
1 2 3 4 5 6 7 8 9 10 11 12 13 14 15 16 17 18 19 20 21 22 23 24 25 |
<!-- 子コンポーネント1 --> <script type="text/x-template" id="custom-component"> <div> <slot> <button>デフォルトボタン</button> </slot> </div> </script> <!-- 子コンポーネント2 --> <script type="text/x-template" id="date-button"> <button v-on:click="onClick">日付表示</button> </script> <!-- 親アプリケーション --> <div id="app"> <!-- 子コンポーネント2 --> <custom-component v-bind:button-text="buttonCaption" v-on:button-click="buttonClick"> <!-- 子コンポーネント1 --> <date-button></date-button> </custom-component> </div> |
JavaScript
|
1 2 3 4 5 6 7 8 9 10 11 12 13 14 15 16 17 18 19 20 21 22 23 24 25 26 27 |
// 子コンポーネント1 const customComponent = { template: '#custom-component' } // 子コンポーネント2 const dateButton = { template: '#date-button', methods: { onClick: function() { const today = new Date(); const year = today.getFullYear(); const month = today.getMonth() + 1; const day = today.getDate(); const date = year + '/' + month + '/' + day; alert(date); } } } // 親アプリケーション Vue.createApp({ components: { 'date-button': dateButton, 'custom-component': customComponent } }).mount('#app') |
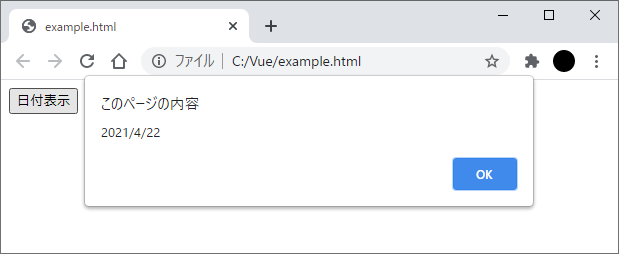
上記の例では、スロットを持つコンポーネント(子コンポーネント1)に別のコンポーネント(子コンポーネント2)を埋め込んでいます。
親アプリケーションから埋め込むコンポーネント(子コンポーネント2)は内部にボタンを持ち、クリックイベントで現在の日付をダイアログボックスで表示します。

