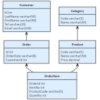
データベースのテーブルのスキーマ情報をもとに、エンティティクラスのソースコードを自動生成するジェネレーターを作成する際に、ソースコードの行数に応じて高さを自動で調整するテキストエリア (textarea) 要素が必要になったので、その作成例を記載します。
今回は Vue CLI を使用したプロジェクトをローカルにインストールして作成します。
目次
環境設定
Vue CLI を使用したプロジェクトで作成するので、以下のコマンドを実行してプロジェクトを作成します。
Vue CLI をインストールするディレクトリに移動する
|
1 |
cd C:\vue-cli\projects |
上記の例ではCドライブに「vue-cli」フォルダを作成し、その中に「projects」フォルダを作成して、そこにVue CLIをインストールします。
Vue CLI をインストールする
Vue CLI をインストールする前に package.json を作成します。
|
1 |
npm init -y |
次に Vue CLI をインストールします。
|
1 |
npm install --save-dev @vue/cli |
ここまでのコマンドはローカルに Vue CLI をインストールするための操作になりますので、既に Vue CLI をグローバルインストールしている場合は不要になります。
プロジェクトを作成する。
Vue CLIをインストールしたディレクトリ (プロジェクトを作成するディレクトリ) に移動してプロジェクトを作成します。
|
1 |
npx vue create sample-project |
上記の例では「C:\vue-cli\projects」フォルダーに「sample-project」という名前でプロジェクトを作成しています。
プロジェクトの階層
|
1 2 3 4 |
C: vue-cli projects sample-project |
プロジェクトの設定
createコマンドを実行すると、プロジェクトの作成方法を「デフォルト (default)」で行うか「手動 (Manually)」で行うかの選択が表示されます。
「デフォルト」を選択すると、babel, eslintがインストールされます。
|
1 2 3 |
? Please pick a preset: (Use arrow keys) > default (babel, eslint) Manually select features |
今回は「手動」を選択します。
「手動」を選択すると、必要とする機能の選択肢が表示されます。
|
1 2 3 4 5 6 7 8 9 10 |
? Check the features needed for your project: (Press <space> to select, <a> to toggle all, <i> to invert selection) >(*) Babel ( ) TypeScript ( ) Progressive Web App (PWA) Support ( ) Router ( ) Vuex ( ) CSS Pre-processors (*) Linter / Formatter ( ) Unit Testing ( ) E2E Testing |
TypeScriptを使用したいので選択して次へ進みます。
|
1 2 3 4 5 6 7 8 9 |
(*) Babel >(*) TypeScript ( ) Progressive Web App (PWA) Support ( ) Router ( ) Vuex ( ) CSS Pre-processors (*) Linter / Formatter ( ) Unit Testing ( ) E2E Testing |
機能の設定に関する質問がいくつかされますが、リンター (linter) の設定以外はそのまま (Enter キー押下で) 進みます。
リンターの設定では、TSLint (deprecated) を選択します。
|
1 2 3 4 5 6 |
? Pick a linter / formatter config: ESLint with error prevention only ESLint + Airbnb config ESLint + Standard config ESLint + Prettier > TSLint (deprecated) |
全ての設定が終わると、プロジェクトの設定内容を保存するかどうかが確認されます。
|
1 2 3 4 5 6 7 8 |
? Please pick a preset: Manually select features ? Check the features needed for your project: Babel, TS, Linter ? Use class-style component syntax? Yes ? Use Babel alongside TypeScript (required for modern mode, auto-detected polyfills, transpiling JSX)? Yes ? Pick a linter / formatter config: TSLint ? Pick additional lint features: (Press <space> to select, <a> to toggle all, <i> to invert selection)Lint on save ? Where do you prefer placing config for Babel, PostCSS, ESLint, etc.? In dedicated config files ? Save this as a preset for future projects? (y/N) |
今回は保存しないので No で進みます。
プロジェクトの作成が無事終わったら、プロジェクトのフォルダーに移動して「npm run serve」で開発サーバーを起動します。
|
1 2 3 |
cd sample-project npm run serve |
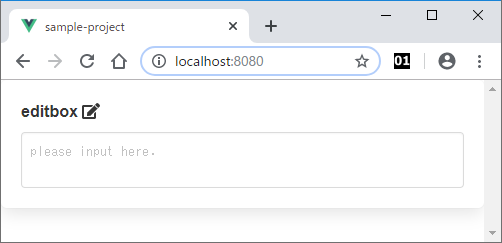
http://localhost:8080/ とブラウザのアドレスバーに入力して以下の画面が表示されれば、プロジェクトの作成に成功しています。
プロジェクトの枠組みができたので、テキストエリアコンポーネントを作成していきます。
Vue CLI で作成されるコンポーネントファイルは単一ファイルコンポーネントとして作成されますので、自作のテキストエリアコンポーネントも同様に単一ファイルコンポーネントとして作成します。
テキストエリアコンポーネントの作成
作成したプロジェクトのフォルダ、ファイル構成は以下のようになっています。
|
1 2 3 4 5 6 7 8 9 10 11 12 13 14 15 16 17 18 19 20 21 22 23 24 |
sample-project .git node_modules public favicon.ico index.html src assets logo.png components HelloWorld.vue App.vue main.ts shims-tsx.d.ts shims-vue.d.ts .browserslistrc .gitignore babel.config.js package.json postcss.config.js README.md tsconfig.json tslint.json yarn.lock |
上記のファイルについて、以下の3点を改変します。
- public フォルダーの index.html を変更する。
- src\components フォルダーの HelloWorld.vue を削除して CustomTextarea.vue を追加する。
- src フォルダーの App.vue を変更する。
改変後の public フォルダと src フォルダは以下のようになります。
|
1 2 3 4 5 6 7 8 9 10 11 12 |
public favicon.ico index.html src assets logo.png components CustomTextarea.vue App.vue main.ts shims-tsx.d.ts shims-vue.d.ts |
public\index.html
index.htmlでは必要な参照を追加します。
index.html 変更前
|
1 2 3 4 5 6 7 8 9 10 11 12 13 14 15 16 17 |
<!DOCTYPE html> <html lang="en"> <head> <meta charset="utf-8"> <meta http-equiv="X-UA-Compatible" content="IE=edge"> <meta name="viewport" content="width=device-width,initial-scale=1.0"> <link rel="icon" href="<%= BASE_URL %>favicon.ico"> <title>sample-project</title> </head> <body> <noscript> <strong>We're sorry but sample-project doesn't work properly without JavaScript enabled. Please enable it to continue.</strong> </noscript> <div id="app"></div> <!-- built files will be auto injected --> </body> </html> |
index.html 変更後
|
1 2 3 4 5 6 7 8 9 10 11 12 13 14 15 16 17 18 19 20 21 |
<!DOCTYPE html> <html lang="en"> <head> <meta charset="utf-8"> <meta http-equiv="X-UA-Compatible" content="IE=edge"> <meta name="viewport" content="width=device-width,initial-scale=1.0"> <link rel="icon" href="<%= BASE_URL %>favicon.ico"> <!-- Bulma --> <link rel="stylesheet" href="https://cdn.jsdelivr.net/npm/bulma@0.8.0/css/bulma.css"> <!-- Font Awesome --> <script defer src="https://use.fontawesome.com/releases/v5.3.1/js/all.js"></script> <title>sample-project</title> </head> <body> <noscript> <strong>We're sorry but sample-project doesn't work properly without JavaScript enabled. Please enable it to continue.</strong> </noscript> <div id="app"></div> <!-- built files will be auto injected --> </body> </html> |
index.html では、CSS フレームワークの Bulma と、アイコンフォントの Font Awesome を使用したいので参照しています。
src\components\CustomTextarea.vue
高さを自動調整するテキストエリアコンポーネントを作成します。
テキストエリアのプロパティには以下の4つを作成します
- value: string
- placeholder: string
- disabled: boolean
- readonly: boolean
イベントには以下の3つを作成します。
- input
- focus
- blur
CustomTextarea.vue の作成
CustomTextarea.vue についてはデコレータを使用する場合と、使用しない場合の両方のソースコードを記載します。
デコレータを使用する場合
|
1 2 3 4 5 6 7 8 9 10 11 12 13 14 15 16 17 18 19 20 21 22 23 24 25 26 27 28 29 30 31 32 33 34 35 36 37 38 39 40 41 42 43 44 45 46 47 48 |
<template> <textarea class="textarea" wrap="off" v-bind:rows="rows" v-bind:placeholder="placeholder" v-bind:disabled="disabled" v-bind:readonly="readonly" v-bind:value="value" v-on:input="inputValue($event)" v-on:focus="$emit('focus', $event)" v-on:blur="$emit('blur', $event)" /> </template> <script lang="ts"> import { Component, Prop, Emit, Vue } from 'vue-property-decorator'; @Component export default class CustomTextarea extends Vue { // props @Prop({ default: '' }) private value!: string; @Prop({ default: '' }) private placeholder?: string; @Prop({ default: false }) private disabled?: boolean; @Prop({ default: false }) private readonly?: boolean; // emit @Emit('input') inputValue(e: Event): string { return (e.target as any).value; } // computed get rows(): number { // テキストエリアの行数取得 if (this.value) { return this.value.split('\n').length; } return 1; } } </script> <style scoped> textarea { /* テキストエリアのリサイズを禁止する */ resize: none; font-family: "MS ゴシック"; font-size: 13px; } </style> |
デコレータを使用しない場合
|
1 2 3 4 5 6 7 8 9 10 11 12 13 14 15 16 17 18 19 20 21 22 23 24 25 26 27 28 29 30 31 32 33 34 35 36 37 38 39 40 41 42 43 44 45 46 47 48 49 50 51 52 53 54 55 56 57 58 59 60 61 |
<template> <textarea class="textarea" wrap="off" v-bind:rows="rows" v-bind:placeholder="placeholder" v-bind:disabled="disabled" v-bind:readonly="readonly" v-bind:value="value" v-on:input="inputValue($event)" v-on:focus="$emit('focus', $event)" v-on:blur="$emit('blur', $event)" /> </template> <script lang="ts"> import Vue from 'vue' export default Vue.extend({ name: 'CustomTextarea', props: { value: { type: String, require: true }, placeholder: { type: String, default: '' }, disabled: { type: Boolean, default: false }, readonly: { type: Boolean, default: false } }, methods: { inputValue(e: Event): void { this.$emit('input', (e.target as any).value); } }, computed: { rows(): number { // テキストエリアの行数取得 if (this.value) { return String(this.value).split('\n').length; } return 1; } } }); </script> <style scoped> textarea { /* テキストエリアのリサイズを禁止する */ resize: none; font-family: "MS ゴシック"; font-size: 13px; } </style> |
CustomTextarea.vue では、テキストエリアの改行の数に応じて、テキストエリアの高さ (rows) を変更しています。
また、ソースコードを表示するので、自動改行が行われないように wrap=”off” を指定し、スタイルでテキストエリアのリサイズを禁止して、フォントを等幅フォントの「MS ゴシック 13px」にしています。
src\App.vue
テキストエリアを使用するアプリケーションを変更します。
App.vue では、HelloWorld コンポーネントを配置していた箇所を、新しく作成したテキストエリアの CustomTextarea コンポーネントに置き換えます。
テキストエリアに必要なプロパティをバインドして、イベントを処理します。
App.vue 変更前
|
1 2 3 4 5 6 7 8 9 10 11 12 13 14 15 16 17 18 19 20 21 22 23 24 25 26 27 28 29 |
<template> <div id="app"> <img alt="Vue logo" src="./assets/logo.png"> <HelloWorld msg="Welcome to Your Vue.js + TypeScript App"/> </div> </template> <script lang="ts"> import { Component, Vue } from 'vue-property-decorator'; import HelloWorld from './components/HelloWorld.vue'; @Component({ components: { HelloWorld, }, }) export default class App extends Vue {} </script> <style> #app { font-family: 'Avenir', Helvetica, Arial, sans-serif; -webkit-font-smoothing: antialiased; -moz-osx-font-smoothing: grayscale; text-align: center; color: #2c3e50; margin-top: 60px; } </style> |
App.vue 変更後
App.vue についてもデコレータを使用する場合と、使用しない場合の両方のソースコードを記載します。
デコレータを使用する場合
|
1 2 3 4 5 6 7 8 9 10 11 12 13 14 15 16 17 18 19 20 21 22 23 24 25 26 27 28 29 30 31 32 33 34 35 36 37 38 39 40 41 42 43 44 45 46 47 48 49 50 51 52 53 54 55 |
<template> <div id="app"> <div class="wrapper"> <div class="box"> <div class="field"> <label class="label">editbox <i class="fas fa-edit"></i></label> <div class="control"> <custom-textarea v-model="text" v-bind:placeholder="placeholder" v-bind:disabled="disabled" v-bind:readonly="readonly" v-on:focus="focus" v-on:blur="blur" /> </div> </div> </div> </div> </div> </template> <script lang="ts"> import { Component, Vue } from 'vue-property-decorator'; import CustomTextarea from './components/CustomTextarea.vue' @Component({ components: { CustomTextarea, }, }) export default class App extends Vue { // data text: string = ''; placeholder: string = 'please input here.'; disabled: boolean = false; readonly: boolean = false; // methods focus(): void { console.log('focus'); } blur(): void { console.log('blur'); } } </script> <style> #app { font-family: 'Avenir', Helvetica, Arial, sans-serif, FontAwesome; -webkit-font-smoothing: antialiased; -moz-osx-font-smoothing: grayscale; color: #2c3e50; } </style> |
デコレータを使用しない場合
|
1 2 3 4 5 6 7 8 9 10 11 12 13 14 15 16 17 18 19 20 21 22 23 24 25 26 27 28 29 30 31 32 33 34 35 36 37 38 39 40 41 42 43 44 45 46 47 48 49 50 51 52 53 54 55 56 57 58 59 |
<template> <div id="app"> <div class="wrapper"> <div class="box"> <div class="field"> <label class="label">editbox <i class="fas fa-edit"></i></label> <div class="control"> <custom-textarea v-model="text" v-bind:placeholder="placeholder" v-bind:disabled="disabled" v-bind:readonly="readonly" v-on:focus="focus" v-on:blur="blur" /> </div> </div> </div> </div> </div> </template> <script lang="ts"> import Vue from 'vue' import CustomTextarea from './components/CustomTextarea.vue' export default Vue.extend({ name: 'App', components: { CustomTextarea }, data() { return { text: '', placeholder: 'please input here.', disabled: false, readonly: false } }, methods: { focus(): void { console.log('focus'); }, blur(): void { console.log('blur'); }, } }); </script> <style> #app { font-family: 'Avenir', Helvetica, Arial, sans-serif; -webkit-font-smoothing: antialiased; -moz-osx-font-smoothing: grayscale; color: #2c3e50; } .wrapper { padding: 10px; } </style> |
テキストエリアの値は v-model でバインドします。
その他のプロパティの placeholder, disabled, readonly は v-bind でバインドします。
focus イベントと、blur イベントではサンプルとしてコンソールにログを表示する処理を記載しています。
テキストエリアの表示
ここまでの変更を適用して、ブラウザで http://localhost:8080/ に接続すると、以下のようなテキストエリアが表示されます。
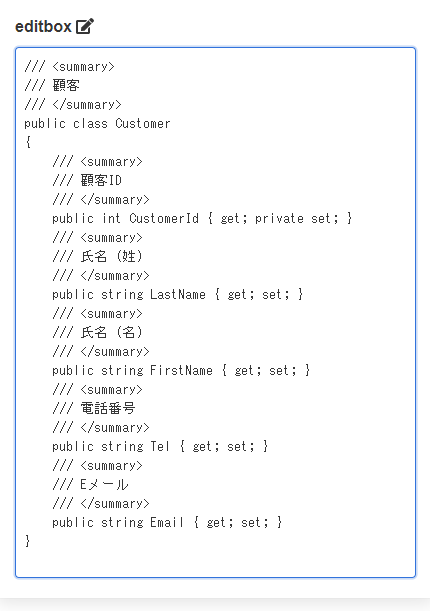
このテキストエリアにコードを入力すると、以下のように改行に合わせて高さを自動で調節してくれます。
Vue.js の単一ファイルコンポーネントを使用すると、簡単にコンポーネントが作成できるのでとても便利です。