Vue.jsを使用してWeb(ブラウザー)上で色の作成ができるカラーミキサーコンポーネントを作成します。
カラーミキサーコンポーネントはRGB形式とHSL形式に対応させます。
目次
プロジェクトの作成
プロジェクトはVueCLIで作成します。コマンドプロンプトを開いてプロジェクトを作成するフォルダー(ディレクトリ)に移動します。
以下のコマンドはあらかじめVue CLI がグローバルインストールされている(「npm uninstall -g vue-cli」コマンドが実行されている)ことを前提とします。
|
1 |
vue create color-mixer-project |
グローバルインストロールではなくローカルにインストールしている場合は、コマンドの頭に「npx」を付けて
|
1 |
npx vue create color-mixer-project |
を実行してください。
上記の例では「color-mixer-project」という名前のプロジェクトを作成しています。
プロジェクトの設定
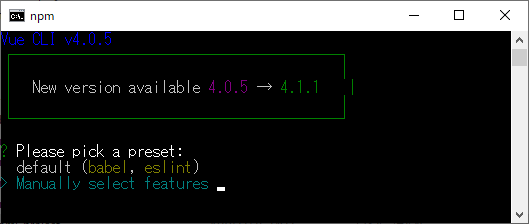
vue createコマンドを実行すると、デフォルトインストールするか、手動インストールするかを訊かれますので「Manually select features」を選択してEnterキーを押します。
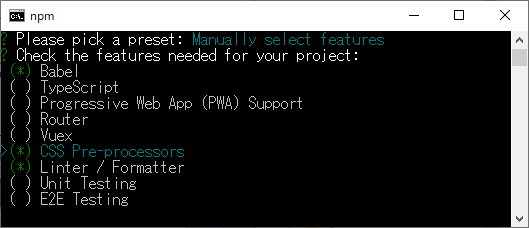
「Manually select features」を選択すると必要なプラグインの選択をします。ここでは「CSS Pre-processors」を追加で選択してEnterキーを押します。
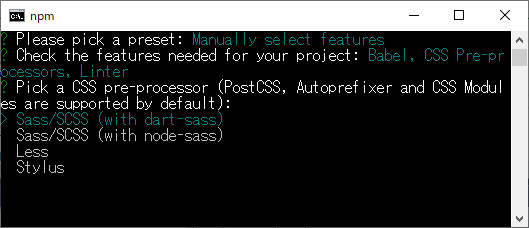
「CSS Pre-processors」の選択では「Sass/SCSS (with dart-sass)」を選択してEnterキーを押します。
後はすべてEnterキーを押してインストールを進めます。
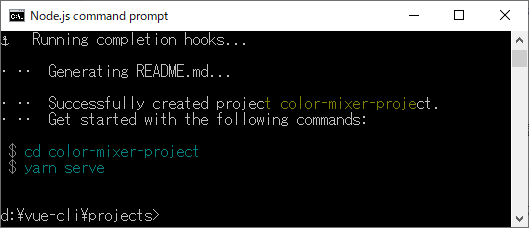
上記の画面が表示されればプロジェクトのインストールは完了です。
コンポーネントの作成
コンポーネントを作成します。
プロジェクトを作成したフォルダー(ここでは「color-mixer-project」)の「src\components」に単一ファイルコンポーネントを作成します。
既に「HelloWorld.vue」というファイルがあるので、コピーして作成してもいいでしょう。
ここではRGB形式用のコンポーネントの「RgbColorMixer.vue」とHSL形式用のコンポーネントの「HslColorMixer.vue」の2つを作成します。
RgbColorMixer.vue
RgbColorMixerコンポーネントは、赤、緑、青の3色を指定するスライダーと、3色を合成して色を作成した結果をカラーコードと一緒に表示します。
ソースコードは以下のようになります。単一ファイルコンポーネントなので、ファイルにHTML、スクリプト、スタイルのすべてが記述されていますが、わかりやすいように分けて記載します。
HTMLのテンプレート部分のソースコードです。
|
1 2 3 4 5 6 7 8 9 10 11 12 13 14 15 16 17 18 19 20 21 22 23 24 25 26 27 28 29 30 31 32 33 34 35 36 37 38 39 |
<template> <div class="frame box"> <span class="title">RGB カラーミキサー</span> <div class="field"> <input class="slider is-fullwidth is-danger" type="range" min="0" max="255" step="1" v-model.number="red" /> <div>Red (赤): {{red}}</div> </div> <div class="field"> <input class="slider is-fullwidth is-success" type="range" min="0" max="255" step="1" v-model.number="green" /> <div>Green (緑): {{green}}</div> </div> <div class="field"> <input class="slider is-fullwidth is-info" type="range" min="0" max="255" step="1" v-model.number="blue" /> <div>Blue (青): {{blue}}</div> </div> <div> <input class="input is-large" type="text" readonly v-bind:style="{'background-color': rgb}" v-model="colorCode" /> </div> </div> </template> |
class属性に指定しているスタイルの「title」や「slider is-fullwidth is-danger」の部分はBulma(BulmaExtensionsを含む)を使用しています。
Bulmaはnpmでインストールできます。
|
1 |
npm install bulma |
|
1 |
npm install bulma-extensions |
インストールしたBulmaのスタイルはスクリプトでimportします。
スクリプト部分のソースコードです。ここではTypeScript等のaltJSは使用せずにJavaScriptでコーディングしています。
|
1 2 3 4 5 6 7 8 9 10 11 12 13 14 15 16 17 18 19 20 21 22 23 24 25 26 27 28 29 30 31 32 33 34 35 36 37 38 39 40 41 42 43 44 45 46 47 48 49 50 51 52 53 |
<script> import '../style/bulma/css/bulma.css'; import '../style/bulma-extensions/dist/css/bulma-extensions.min.css' export default { name: 'RgbColorMixer', data() { return { red: 0, green: 0, blue: 0, } }, computed: { // Red (赤) 16進数 redHex() { let h = this.decimalToHex(this.red); h = this.zeroPadding(h); return h; }, // Green (緑) 16進数 greenHex() { let h = this.decimalToHex(this.green); h = this.zeroPadding(h); return h; }, // Blue (青) 16進数 blueHex() { let h = this.decimalToHex(this.blue); h = this.zeroPadding(h); return h; }, // カラーコード colorCode() { return `#${this.redHex}${this.greenHex}${this.blueHex}`; }, // RGB rgb() { return `rgb(${this.red}, ${this.green}, ${this.blue})`; }, }, methods: { // 10進数から16進数に変換する decimalToHex(value) { return Number(value).toString(16); }, // 0パディング(2桁) zeroPadding(value) { return ('00' + value).slice(-2); }, }, } </script> |
スタイル部分のソースコードです。CSSはSCSS形式のSassを使用しています。
|
1 2 3 4 5 6 7 8 9 10 11 12 |
<style scoped lang="scss"> .frame { margin: 10px; margin-top: 20px; } .field { margin-bottom: 10px; :last-child { margin-bottom: 0; } } </style> |
HslColorMixer.vue
以下のソースコードはHSL形式で色を作成するHslColorMixerコンポーネントのものになります。
HslColorMixerコンポーネントもRgbColorMixerコンポーネントと同様に、スライダーで選択した条件によって色を作成します。
HSL形式では、赤、緑、青の3色の替わりに「色相」「彩度」「輝度」を指定します。
|
1 2 3 4 5 6 7 8 9 10 11 12 13 14 15 16 17 18 19 20 21 22 23 24 25 26 27 28 29 30 31 32 33 34 35 36 37 38 39 |
<template> <div class="frame box"> <span class="title">HSL カラーミキサー</span> <div class="field"> <input class="slider is-fullwidth" type="range" min="0" max="360" step="1" v-model.number="hue" /> <div>Hue (色相): {{hue}}</div> </div> <div class="field"> <input class="slider is-fullwidth" type="range" min="0" max="100" step="1" v-model.number="saturation" /> <div>Saturation (彩度): {{saturation}}</div> </div> <div class="field"> <input class="slider is-fullwidth" type="range" min="0" max="100" step="1" v-model.number="lightness" /> <div>Lightness (輝度): {{lightness}}</div> </div> <div> <input class="input is-large" type="text" readonly v-bind:style="{'background-color': hsl}" v-model="colorCode" /> </div> </div> </template> |
|
1 2 3 4 5 6 7 8 9 10 11 12 13 14 15 16 17 18 19 20 21 22 23 24 25 26 27 28 29 30 31 32 33 34 35 36 37 38 39 40 41 42 43 44 45 46 47 48 49 50 51 52 53 54 55 56 57 58 59 60 61 62 63 64 65 66 67 68 69 70 71 72 73 74 75 76 77 78 79 80 81 82 83 84 85 86 87 88 89 90 91 92 93 94 95 96 97 98 99 100 101 102 103 104 105 106 107 108 109 110 111 112 113 114 115 116 117 118 119 120 121 122 123 124 125 126 127 |
<script> import '../style/bulma/css/bulma.css'; import '../style/bulma-extensions/dist/css/bulma-extensions.min.css' export default { name: 'HslColorMixer', data() { return { hue: 0, saturation: 0, lightness: 0, } }, computed: { // カラーコード colorCode() { return this.toRgbColorCode(); }, // HSL hsl() { return `hsl(${this.hue}, ${this.saturation}%, ${this.lightness}%)`; }, }, methods: { // HSL を RGB カラーコードに変換 toRgbColorCode() { if (this.lightness === 0) { // 輝度 0 return '#000000'; } if (this.lightness === 100) { // 輝度 100 return '#ffffff'; } const h = this.hue % 360; const s = this.saturation / 100; const l = this.lightness / 100; // 範囲値 let range; if (l < 0.5) { range = l; } else { range = 1 - l; } // 最大値 const max = l + (range * s); // 最小値 const min = l - (range * s); // RGB let red; let green; let blue; if (h <= 60) { red = max; green = (h / 60) * (max - min) + min; blue = min; } else if (h <= 120) { red = ((120 - h) / 60) * (max - min) + min; green = max; blue = min; } else if (h <= 180) { red = min; green = max; blue = ((h - 120) / 60) * (max - min) + min; } else if (h <= 240) { red = min; green = ((240 - h) / 60) * (max - min) + min; blue = max; } else if (h <= 300) { red = ((h - 240) / 60) * (max - min) + min; green = min; blue = max; } else { red = max; green = min; blue = ((360 - h) / 60) * (max - min) + min; } // 調整 red = Math.floor(red * 255); if (red > 255) { red = 255; } else if (red < 0) { red = 0; } green = Math.floor(green * 255); if (green > 255) { green = 255; } else if (green < 0) { green = 0; } blue = Math.floor(blue * 255); if (blue > 255) { blue = 255; } else if (blue < 0) { blue = 0; } // RGB 16進数 const r = this.zeroPadding(this.decimalToHex(red)); const g = this.zeroPadding(this.decimalToHex(green)); const b = this.zeroPadding(this.decimalToHex(blue)); // カラーコード return `#${r}${g}${b}`; }, // 10進数から16進数に変換する decimalToHex(value) { return Number(value).toString(16); }, // 0パディング(2桁) zeroPadding(value) { return ('00' + value).slice(-2); }, }, } </script> |
HSL色空間で作成した色をtoRgbColorCodeメソッドでRGBに変換して、カラーコードを生成して表示しています。
|
1 2 3 4 5 6 7 8 9 10 11 12 |
<style scoped lang="scss"> .frame { margin: 10px; margin-top: 20px; } .field { margin-bottom: 10px; :last-child { margin-bottom: 0; } } </style> |
コンポーネントを利用するアプリケーション
srcフォルダーの直下にある「App.vue」ファイルを変更します。
HelloWorldコンポーネントを使用している箇所を、RgbColorMixerコンポーネントとHslColorMixerコンポーネントに置き換えます。
以下ソースコードになります。
|
1 2 3 4 5 6 |
<template> <div id="app"> <rgb-color-mixer /> <hsl-color-mixer /> </div> </template> |
|
1 2 3 4 5 6 7 8 9 10 11 12 |
<script> import RgbColorMixer from './components/RgbColorMixer.vue' import HslColorMixer from './components/HslColorMixer.vue' export default { name: 'app', components: { RgbColorMixer, HslColorMixer, } } </script> |
|
1 2 3 4 5 6 |
<style lang="scss"> #app { font-family: 'Avenir', Helvetica, Arial, sans-serif; color: #2c3e50; } </style> |
プロジェクトの実行
ブラウザーのアドレスに「http://localhost:8080/」と入力してプロジェクトを実行します。
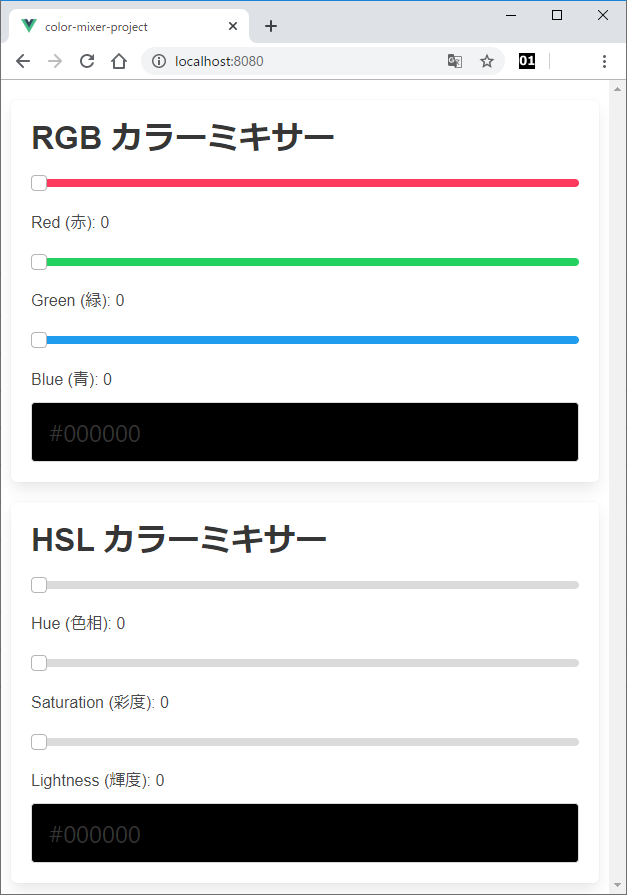
ブラウザーにRGBとHSLのカラーミキサーコンポーネントが表示されました。
スライダーを動かして色を作成してみます。
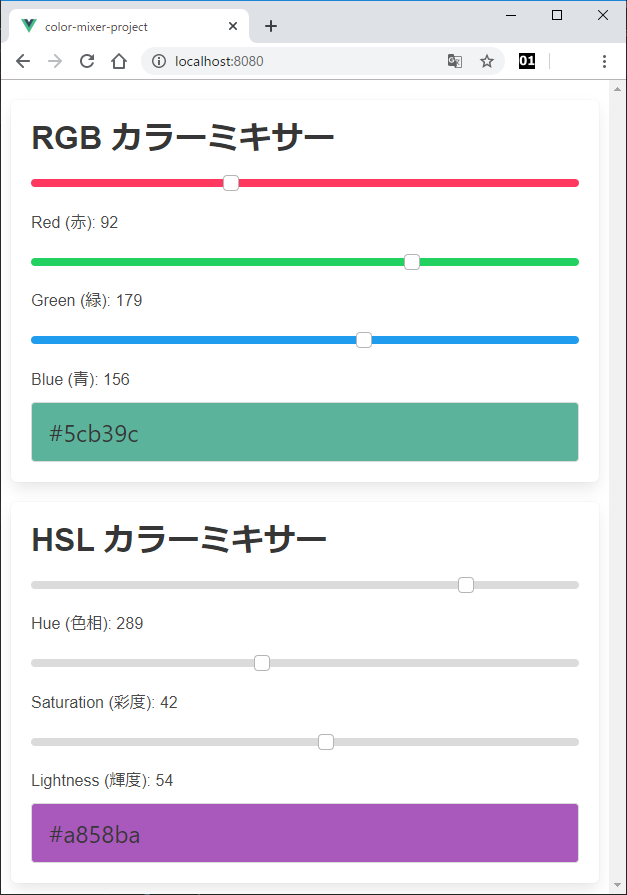
RGB形式、HSL形式ともに、スライダーで選択した条件に応じて色を作成することができました。