
Webシステムでは、CSVファイルやエクセルファイルなどのデータファイルをサーバーにアップロードする機能を実装する場合があります。
クライアントからサーバーへファイルをアップロードする際には、HTMLのファイル選択ボタンが使用されます。

Bulmaには、このファイル選択ボタンのスタイルをカスタマイズするためのクラスが用意されています。
今回は、ファイル選択ボタンのスタイリングに使用するfileクラスとその関連クラスについて紹介します。
目次
ファイル選択ボタンのスタイルを設定するfileクラス
fileクラスはファイル選択ボタンのinput要素(type=”file”)をラップするコンテナです。
Bulmaのファイル選択ボタンのスタイルを設定するクラスは、fileクラスの他にもいくつかのサブクラスで構成されています。
fileクラスとサブクラス
fileクラスのサブクラスには、以下のものがあります。
| クラス | 説明 |
|---|---|
| file | メインのコンテナクラスです。 |
| file-label | クリック可能なボタン部分のクラスです。 |
| file-input | input要素に指定するクラスです。 |
| file-cta | アイコンとラベルのコンテナクラスです。 |
| file-icon | アイコンのクラスです。 |
| file-label | ラベルのクラスです。 |
| file-name | ファイル名のクラスです。 |
最もシンプルな表示
fileクラスを使用した最もシンプルな形式のファイル選択ボタンの表示は、以下のようになります。

HTML
|
1 2 3 4 5 6 7 8 9 10 |
<div class="file"> <label class="file-label"> <input class="file-input" type="file" name="resume"> <span class="file-cta"> <span class="file-label"> ファイルを選択… </span> </span> </label> </div> |
アイコンを表示
アイコンを表示すると、以下のようになります。

HTML
|
1 2 3 4 5 6 7 8 9 10 11 12 13 |
<div class="file"> <label class="file-label"> <input class="file-input" type="file" name="resume"> <span class="file-cta"> <span class="file-icon"> <i class="fas fa-upload"></i> </span> <span class="file-label"> ファイルを選択… </span> </span> </label> </div> |
アイコンの表示にはfile-iconクラスを使用します。
file-iconクラスを指定した要素の子要素にアイコンを配置します。
ここでは、Font Awesomeのファイルアップロードのアイコンを指定しました。
ファイル名を表示
ファイル名を表示すると、以下のようになります。

HTML
|
1 2 3 4 5 6 7 8 9 10 11 12 13 14 15 16 |
<div class="file has-name"> <label class="file-label"> <input class="file-input" type="file" name="resume"> <span class="file-cta"> <span class="file-icon"> <i class="fas fa-upload"></i> </span> <span class="file-label"> ファイルを選択… </span> </span> <span class="file-name"> 選択されたファイル.xls </span> </label> </div> |
ファイル名を表示する際には、fileクラスを指定した要素にhas-nameクラスを追加します。
input要素と同じ階層にspan要素を配置してfile-nameクラスを指定すると、ファイル名が表示されるようになります。
ファイル名を表示する場合は、JavaScriptなどを使用して選択されたファイルのファイル名を取得して設定する必要があります。
ファイル名を設定する処理については、本記事のfileクラスの使用例に記載しています。
ファイル選択ボタンを右に表示
通常は左側にあるファイル選択ボタンを右側に配置することができます。

HTML
|
1 2 3 4 5 6 7 8 9 10 11 12 13 14 15 16 |
<div class="file has-name is-right"> <label class="file-label"> <input class="file-input" type="file" name="resume"> <span class="file-cta"> <span class="file-icon"> <i class="fas fa-upload"></i> </span> <span class="file-label"> ファイルを選択… </span> </span> <span class="file-name"> ファイル名.csv </span> </label> </div> |
ファイル選択ボタンを右側に配置する時は、is-rightクラスを指定します。
is-rightクラスは、fileクラス(とhas-nameクラス)を指定した要素に追加で指定します。
is-rightクラスを使用すると要素(コントロール)自体が右寄せで配置されます。
ファイル名を広げて横の余白を埋める
ファイル名を横に展開して余白を埋めることができます。

HTML
|
1 2 3 4 5 6 7 8 9 10 11 12 13 14 15 16 |
<div class="file has-name is-fullwidth"> <label class="file-label"> <input class="file-input" type="file" name="resume"> <span class="file-cta"> <span class="file-icon"> <i class="fas fa-upload"></i> </span> <span class="file-label"> ファイルを選択… </span> </span> <span class="file-name"> ファイル名.png </span> </label> </div> |
ファイル名を広げる時は、is-fullwidthクラスを指定します。
is-fullwidthクラスは、is-rightクラスと同様にfileクラスを指定した要素に追加で指定します。
is-rightクラスを指定している場合の表示は、以下のようになります。

HTML
|
1 2 3 4 5 6 7 8 9 10 11 12 13 14 15 16 |
<div class="file has-name is-right is-fullwidth"> <label class="file-label"> <input class="file-input" type="file" name="resume"> <span class="file-cta"> <span class="file-icon"> <i class="fas fa-upload"></i> </span> <span class="file-label"> ファイルを選択… </span> </span> <span class="file-name"> ファイル名.png </span> </label> </div> |
ボックス化
Bulmaではファイル選択ボタンをボックス化することができます。

HTML
|
1 2 3 4 5 6 7 8 9 10 11 12 13 |
<div class="file is-boxed"> <label class="file-label"> <input class="file-input" type="file" name="resume"> <span class="file-cta"> <span class="file-icon"> <i class="fas fa-upload"></i> </span> <span class="file-label"> ファイルを選択… </span> </span> </label> </div> |
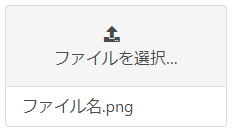
ファイル選択ボタンのボックス化には、is-boxedクラスを使用します。
is-boxedクラスはfileクラスを指定した要素に追加で指定します。
ファイル名を表示している場合は、以下のように表示されます。
HTML
|
1 2 3 4 5 6 7 8 9 10 11 12 13 14 15 16 |
<div class="file is-boxed has-name"> <label class="file-label"> <input class="file-input" type="file" name="resume"> <span class="file-cta"> <span class="file-icon"> <i class="fas fa-upload"></i> </span> <span class="file-label"> ファイルを選択… </span> </span> <span class="file-name"> ファイル名.png </span> </label> </div> |
ファイル選択ボタンの色
Bulmaに用意されているカラークラスを指定することで、ファイル選択ボタンの色を変更することができます。
カラークラスには、以下の10種類があります。
- is-white
- is-black
- is-light
- is-dark
- is-primary
- is-link
- is-info
- is-success
- is-warning
- is-danger

HTML
|
1 2 3 4 5 6 7 8 9 10 11 12 13 14 15 16 17 18 19 20 21 22 23 24 25 26 27 28 29 30 31 32 33 34 35 36 37 38 39 40 41 42 43 44 45 46 47 48 49 50 51 52 53 54 55 56 57 58 59 60 61 62 63 64 65 66 67 68 69 70 71 72 73 74 75 76 77 78 79 80 81 82 83 84 85 86 87 88 89 90 91 92 93 94 95 96 97 98 99 100 101 102 103 104 105 106 107 108 109 110 111 112 113 114 115 116 117 118 119 120 121 122 123 124 125 126 127 128 129 |
<div class="field"> <div class="file is-white"> <label class="file-label"> <input class="file-input" type="file" name="resume"> <span class="file-cta"> <span class="file-label"> ファイルを選択… </span> </span> </label> </div> </div> <div class="field"> <div class="file is-black"> <label class="file-label"> <input class="file-input" type="file" name="resume"> <span class="file-cta"> <span class="file-label"> ファイルを選択… </span> </span> </label> </div> </div> <div class="field"> <div class="file is-light"> <label class="file-label"> <input class="file-input" type="file" name="resume"> <span class="file-cta"> <span class="file-label"> ファイルを選択… </span> </span> </label> </div> </div> <div class="field"> <div class="file is-dark"> <label class="file-label"> <input class="file-input" type="file" name="resume"> <span class="file-cta"> <span class="file-label"> ファイルを選択… </span> </span> </label> </div> </div> <div class="field"> <div class="file is-primary"> <label class="file-label"> <input class="file-input" type="file" name="resume"> <span class="file-cta"> <span class="file-label"> ファイルを選択… </span> </span> </label> </div> </div> <div class="field"> <div class="file is-link"> <label class="file-label"> <input class="file-input" type="file" name="resume"> <span class="file-cta"> <span class="file-label"> ファイルを選択… </span> </span> </label> </div> </div> <div class="field"> <div class="file is-info"> <label class="file-label"> <input class="file-input" type="file" name="resume"> <span class="file-cta"> <span class="file-label"> ファイルを選択… </span> </span> </label> </div> </div> <div class="field"> <div class="file is-success"> <label class="file-label"> <input class="file-input" type="file" name="resume"> <span class="file-cta"> <span class="file-label"> ファイルを選択… </span> </span> </label> </div> </div> <div class="field"> <div class="file is-warning"> <label class="file-label"> <input class="file-input" type="file" name="resume"> <span class="file-cta"> <span class="file-label"> ファイルを選択… </span> </span> </label> </div> </div> <div class="field"> <div class="file is-danger"> <label class="file-label"> <input class="file-input" type="file" name="resume"> <span class="file-cta"> <span class="file-label"> ファイルを選択… </span> </span> </label> </div> </div> |
色を表すクラスは、fileクラスを指定した要素に追加で指定します。
ファイル選択ボタンのサイズ
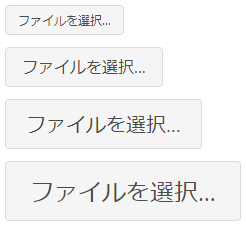
Bulmaには、ファイル選択ボタンのサイズを指定するためのクラスが用意されています。
サイズを表すクラスには、以下の4種類があります。
- is-small
- is-normal
- is-medium
- is-large
HTML
|
1 2 3 4 5 6 7 8 9 10 11 12 13 14 15 16 17 18 19 20 21 22 23 24 25 26 27 28 29 30 31 32 33 34 35 36 37 38 39 40 41 42 43 44 45 46 47 48 49 50 51 |
<div class="field"> <div class="file is-small"> <label class="file-label"> <input class="file-input" type="file" name="resume"> <span class="file-cta"> <span class="file-label"> ファイルを選択… </span> </span> </label> </div> </div> <div class="field"> <div class="file is-normal"> <label class="file-label"> <input class="file-input" type="file" name="resume"> <span class="file-cta"> <span class="file-label"> ファイルを選択… </span> </span> </label> </div> </div> <div class="field"> <div class="file is-medium"> <label class="file-label"> <input class="file-input" type="file" name="resume"> <span class="file-cta"> <span class="file-label"> ファイルを選択… </span> </span> </label> </div> </div> <div class="field"> <div class="file is-large"> <label class="file-label"> <input class="file-input" type="file" name="resume"> <span class="file-cta"> <span class="file-label"> ファイルを選択… </span> </span> </label> </div> </div> |
サイズを表すクラスは、fileクラスを指定した要素に追加で指定します。
サイズを省略するとis-normalを指定した時と同じ大きさになります。
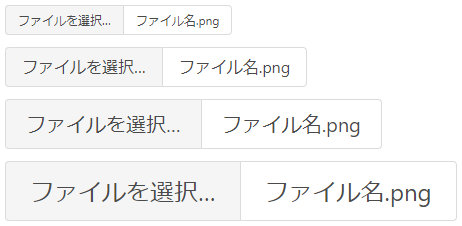
ファイル名を表示した場合は、次のようになります。
HTML
|
1 2 3 4 5 6 7 8 9 10 11 12 13 14 15 16 17 18 19 20 21 22 23 24 25 26 27 28 29 30 31 32 33 34 35 36 37 38 39 40 41 42 43 44 45 46 47 48 49 50 51 52 53 54 55 56 57 58 59 60 61 62 63 |
<div class="field"> <div class="file is-small has-name"> <label class="file-label"> <input class="file-input" type="file" name="resume"> <span class="file-cta"> <span class="file-label"> ファイルを選択… </span> </span> <span class="file-name"> ファイル名.png </span> </label> </div> </div> <div class="field"> <div class="file is-normal has-name"> <label class="file-label"> <input class="file-input" type="file" name="resume"> <span class="file-cta"> <span class="file-label"> ファイルを選択… </span> </span> <span class="file-name"> ファイル名.png </span> </label> </div> </div> <div class="field"> <div class="file is-medium has-name"> <label class="file-label"> <input class="file-input" type="file" name="resume"> <span class="file-cta"> <span class="file-label"> ファイルを選択… </span> </span> <span class="file-name"> ファイル名.png </span> </label> </div> </div> <div class="field"> <div class="file is-large has-name"> <label class="file-label"> <input class="file-input" type="file" name="resume"> <span class="file-cta"> <span class="file-label"> ファイルを選択… </span> </span> <span class="file-name"> ファイル名.png </span> </label> </div> </div> |
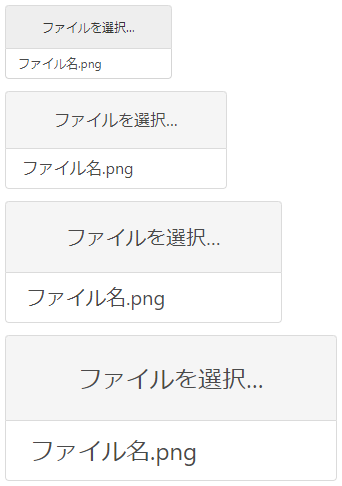
ボックス化した場合は、次のようになります。
HTML
|
1 2 3 4 5 6 7 8 9 10 11 12 13 14 15 16 17 18 19 20 21 22 23 24 25 26 27 28 29 30 31 32 33 34 35 36 37 38 39 40 41 42 43 44 45 46 47 48 49 50 51 52 53 54 55 56 57 58 59 60 61 62 63 |
<div class="field"> <div class="file is-small has-name is-boxed"> <label class="file-label"> <input class="file-input" type="file" name="resume"> <span class="file-cta"> <span class="file-label"> ファイルを選択… </span> </span> <span class="file-name"> ファイル名.png </span> </label> </div> </div> <div class="field"> <div class="file is-normal has-name is-boxed"> <label class="file-label"> <input class="file-input" type="file" name="resume"> <span class="file-cta"> <span class="file-label"> ファイルを選択… </span> </span> <span class="file-name"> ファイル名.png </span> </label> </div> </div> <div class="field"> <div class="file is-medium has-name is-boxed"> <label class="file-label"> <input class="file-input" type="file" name="resume"> <span class="file-cta"> <span class="file-label"> ファイルを選択… </span> </span> <span class="file-name"> ファイル名.png </span> </label> </div> </div> <div class="field"> <div class="file is-large has-name is-boxed"> <label class="file-label"> <input class="file-input" type="file" name="resume"> <span class="file-cta"> <span class="file-label"> ファイルを選択… </span> </span> <span class="file-name"> ファイル名.png </span> </label> </div> </div> |
ファイル選択ボタンの配置
is-rightクラスを使用してファイル選択ボタンを右側に配置すると、要素自体が右寄せに配置されることはすでに記載しましたが、ファイル選択ボタンは、要素自体を中央に配置することもできます。

HTML
|
1 2 3 4 5 6 7 8 9 10 11 12 13 14 15 16 |
<div class="file is-right"> <label class="file-label"> <input class="file-input" type="file" name="resume"> <span class="file-cta"> <span class="file-icon"> <i class="fas fa-upload"></i> </span> <span class="file-label"> ファイルを選択… </span> </span> <span class="file-name"> 右揃え </span> </label> </div> |
fileクラスの使用例(JavaScriptでファイル名を表示する実装)
ここでは、fileクラスを使用してファイル選択ボタンをカスタマイズし、選択されたファイルの名前を表示する例を示します。
HTML
|
1 2 3 4 5 6 7 8 9 10 11 12 13 14 15 |
<div class="file has-name"> <label class="file-label"> <input class="file-input" type="file" name="resume" id="file"> <span class="file-cta"> <span class="file-icon"> <i class="fas fa-upload"></i> </span> <span class="file-label"> ファイルを選択… </span> </span> <span class="file-name" id="fileName"> </span> </label> </div> |
JavaScript
|
1 2 3 4 5 6 7 8 9 10 11 12 13 14 15 16 17 18 19 20 21 22 23 24 25 |
// ファイル選択ボタンの要素を取得します。 const fileElement = document.getElementById("file"); // ファイル選択ボタンのchangeイベントに関数を設定します。 fileElement.addEventListener("change", fileChanged, false); /*************************************** ファイルが変更された際の処理を行う関数 ***************************************/ function fileChanged() { // 選択されているファイルを取得します。 const fileList = this.files; // ファイルが選択されているか確認します。 if (fileList.length > 0) { // 選択されたファイルの名前を取得します。 const name = fileList[0].name; // ファイル名を指定する要素を取得します。 const fileName = document.getElementById("fileName"); // ファイル名を設定して表示します。 fileName.textContent = name; } } |
HTML標準のファイル選択ボタンでファイルを選択すると、Chrome、Firefox、Edgeなどのブラウザーでは、選択したファイル名がボタンの横に表示されますが、Bulmaのfileクラスを適用したファイル選択ボタンでは、ファイル名が表示されません。
Bulmaでのファイル名の表示は、file-nameクラスを指定した要素に対して行います。
しかし、Bulmaのクラスを指定しただけでは、ファイル名の表示は自動で行われません。
なので、ファイル名の表示はBulmaを利用する開発者が行う必要があります。
上記の例では、JavaScriptを使用して選択されたファイルの名前を表示しています。
ファイル選択ボタンのchangeイベントをaddEventListenerメソッドで購読します。
changeイベントでは、選択されたファイルからファイル名を取得してfile-nameクラスが指定されている要素(span)に表示します。
ここでは、ファイル名を表示する処理をfileChanged関数を定義して処理しています。