Bootstrapでテーブル(Table)を装飾する方法を紹介します。
BootstrapはTwitter社が開発したCSSフレームワークです。
Bootstrapではtableタグ(<table>)のclass属性に用意されているをクラスを指定するだけで、簡単にテーブルを装飾することができます。
Bootstrapを導入する方法については、以下の記事を参照してください。
目次
テーブルの設定ルール
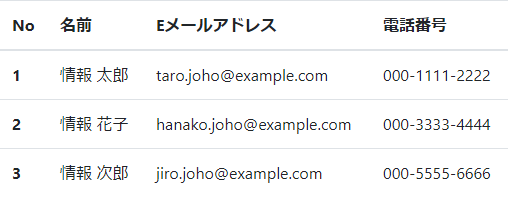
Bootstrapに用意されているテーブルのスタイルを適用するには、class属性に「table」を指定します。
|
1 |
<table class=".table"> |
サンプルコード
以下に.tableクラスを適用したテーブルの装飾例を記載します。
|
1 2 3 4 5 6 7 8 9 10 11 12 13 14 15 16 17 18 19 20 21 22 23 24 25 26 27 28 29 30 31 |
<!-- Bootstrapのテーブル --> <table class="table"> <thead> <tr> <th scope="col">No</th> <th scope="col">名前</th> <th scope="col">Eメールアドレス</th> <th scope="col">電話番号</th> </tr> </thead> <tbody> <tr> <th scope="row">1</th> <td>情報 太郎</td> <td>taro.joho@example.com</td> <td>000-1111-2222</td> </tr> <tr> <th scope="row">2</th> <td>情報 花子</td> <td>hanako.joho@example.com</td> <td>000-3333-4444</td> </tr> <tr> <th scope="row">3</th> <td>情報 次郎</td> <td>jiro.joho@example.com</td> <td>000-5555-6666</td> </tr> </tbody> </table> |
テーブルの色を反転させる
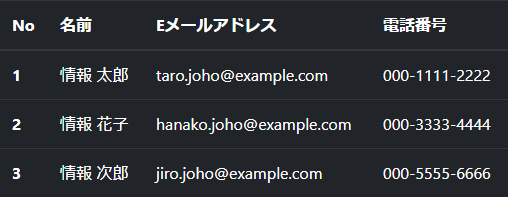
class属性に「table-dark」を指定することで、テーブルの色を反転することができます。
|
1 2 3 4 5 6 7 8 9 10 11 12 13 14 15 16 17 18 19 20 21 22 23 24 25 26 27 28 29 30 31 |
<!-- Bootstrapのテーブル --> <table class="table table-dark"> <thead> <tr> <th scope="col">No</th> <th scope="col">名前</th> <th scope="col">Eメールアドレス</th> <th scope="col">電話番号</th> </tr> </thead> <tbody> <tr> <th scope="row">1</th> <td>情報 太郎</td> <td>taro.joho@example.com</td> <td>000-1111-2222</td> </tr> <tr> <th scope="row">2</th> <td>情報 花子</td> <td>hanako.joho@example.com</td> <td>000-3333-4444</td> </tr> <tr> <th scope="row">3</th> <td>情報 次郎</td> <td>jiro.joho@example.com</td> <td>000-5555-6666</td> </tr> </tbody> </table> |
テーブルのヘッダーの色を設定する
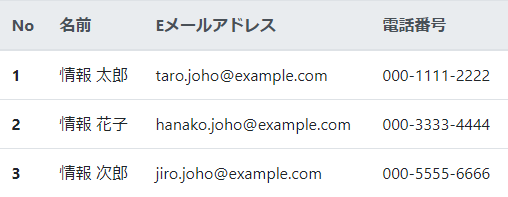
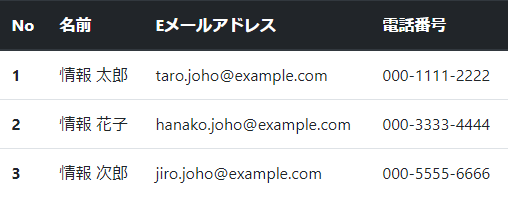
theadタグ(<thead>)のclass属性にBootstrapに用意されているクラスを適用することで、テーブルのヘッダーの色を灰色にしたり、反転させたりすることができます。
「thead-light」を指定すると灰色になり、「thead-dark」を指定すると色が反転します。
ヘッダーの色を灰色にする
|
1 2 3 4 5 6 7 8 9 10 11 12 13 14 15 16 17 18 19 20 21 22 23 24 25 26 27 28 29 30 31 |
<!-- ヘッダーを灰色にする --> <table class="table"> <thead class="thead-light"> <tr> <th scope="col">No</th> <th scope="col">名前</th> <th scope="col">Eメールアドレス</th> <th scope="col">電話番号</th> </tr> </thead> <tbody> <tr> <th scope="row">1</th> <td>情報 太郎</td> <td>taro.joho@example.com</td> <td>000-1111-2222</td> </tr> <tr> <th scope="row">2</th> <td>情報 花子</td> <td>hanako.joho@example.com</td> <td>000-3333-4444</td> </tr> <tr> <th scope="row">3</th> <td>情報 次郎</td> <td>jiro.joho@example.com</td> <td>000-5555-6666</td> </tr> </tbody> </table> |
ヘッダーの色を反転させる
|
1 2 3 4 5 6 7 8 9 10 11 12 13 14 15 16 17 18 19 20 21 22 23 24 25 26 27 28 29 30 31 |
<!-- ヘッダーを反転 --> <table class="table"> <thead class="thead-dark"> <tr> <th scope="col">No</th> <th scope="col">名前</th> <th scope="col">Eメールアドレス</th> <th scope="col">電話番号</th> </tr> </thead> <tbody> <tr> <th scope="row">1</th> <td>情報 太郎</td> <td>taro.joho@example.com</td> <td>000-1111-2222</td> </tr> <tr> <th scope="row">2</th> <td>情報 花子</td> <td>hanako.joho@example.com</td> <td>000-3333-4444</td> </tr> <tr> <th scope="row">3</th> <td>情報 次郎</td> <td>jiro.joho@example.com</td> <td>000-5555-6666</td> </tr> </tbody> </table> |
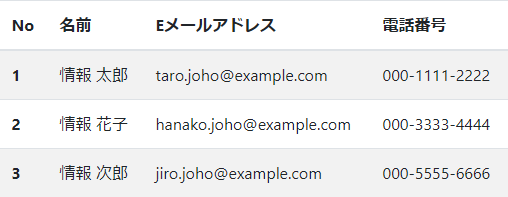
テーブルの行の色を交互に設定する
tableタグ(<table>)のclass属性に「table-striped」を指定することで、行 (<tbody>内の<tr>)の色が交互に変わります。
|
1 2 3 4 5 6 7 8 9 10 11 12 13 14 15 16 17 18 19 20 21 22 23 24 25 26 27 28 29 30 31 |
<!-- 行の色を交互に変更 --> <table class="table table-striped"> <thead> <tr> <th scope="col">No</th> <th scope="col">名前</th> <th scope="col">Eメールアドレス</th> <th scope="col">電話番号</th> </tr> </thead> <tbody> <tr> <th scope="row">1</th> <td>情報 太郎</td> <td>taro.joho@example.com</td> <td>000-1111-2222</td> </tr> <tr> <th scope="row">2</th> <td>情報 花子</td> <td>hanako.joho@example.com</td> <td>000-3333-4444</td> </tr> <tr> <th scope="row">3</th> <td>情報 次郎</td> <td>jiro.joho@example.com</td> <td>000-5555-6666</td> </tr> </tbody> </table> |
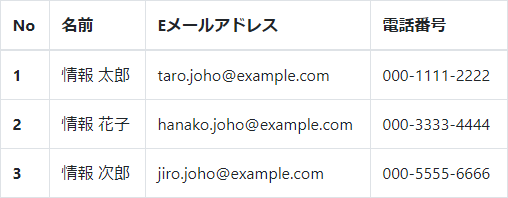
セルの罫線を表示する
tableタグ(<table>)のclass属性に「table-bordered」を指定すると、セルに罫線を表示することができます。
|
1 2 3 4 5 6 7 8 9 10 11 12 13 14 15 16 17 18 19 20 21 22 23 24 25 26 27 28 29 30 31 |
<!-- セルに罫線を表示 --> <table class="table table-bordered"> <thead> <tr> <th scope="col">No</th> <th scope="col">名前</th> <th scope="col">Eメールアドレス</th> <th scope="col">電話番号</th> </tr> </thead> <tbody> <tr> <th scope="row">1</th> <td>情報 太郎</td> <td>taro.joho@example.com</td> <td>000-1111-2222</td> </tr> <tr> <th scope="row">2</th> <td>情報 花子</td> <td>hanako.joho@example.com</td> <td>000-3333-4444</td> </tr> <tr> <th scope="row">3</th> <td>情報 次郎</td> <td>jiro.joho@example.com</td> <td>000-5555-6666</td> </tr> </tbody> </table> |
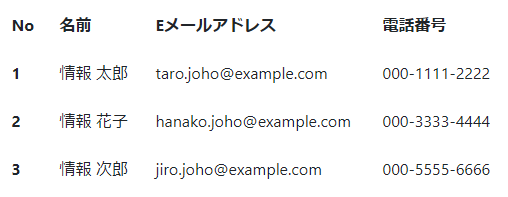
境界線の罫線を表示しない
tableタグ(<table>)のclass属性に「table-borderless」を指定すると、テーブル、行、セルの罫線をなくすことができます。
|
1 2 3 4 5 6 7 8 9 10 11 12 13 14 15 16 17 18 19 20 21 22 23 24 25 26 27 28 29 30 31 |
<!-- 罫線を非表示 --> <table class="table table-borderless"> <thead> <tr> <th scope="col">No</th> <th scope="col">名前</th> <th scope="col">Eメールアドレス</th> <th scope="col">電話番号</th> </tr> </thead> <tbody> <tr> <th scope="row">1</th> <td>情報 太郎</td> <td>taro.joho@example.com</td> <td>000-1111-2222</td> </tr> <tr> <th scope="row">2</th> <td>情報 花子</td> <td>hanako.joho@example.com</td> <td>000-3333-4444</td> </tr> <tr> <th scope="row">3</th> <td>情報 次郎</td> <td>jiro.joho@example.com</td> <td>000-5555-6666</td> </tr> </tbody> </table> |
ホバー(マウスオーバー)時に行をハイライトする
tableタグ(<table>)のclass属性に「table-hover」を指定すると、マウスがある行をハイライト表示することができます。
|
1 2 3 4 5 6 7 8 9 10 11 12 13 14 15 16 17 18 19 20 21 22 23 24 25 26 27 28 29 30 31 |
<!-- ホバーを有効にする --> <table class="table table-hover"> <thead> <tr> <th scope="col">No</th> <th scope="col">名前</th> <th scope="col">Eメールアドレス</th> <th scope="col">電話番号</th> </tr> </thead> <tbody> <tr> <th scope="row">1</th> <td>情報 太郎</td> <td>taro.joho@example.com</td> <td>000-1111-2222</td> </tr> <tr> <th scope="row">2</th> <td>情報 花子</td> <td>hanako.joho@example.com</td> <td>000-3333-4444</td> </tr> <tr> <th scope="row">3</th> <td>情報 次郎</td> <td>jiro.joho@example.com</td> <td>000-5555-6666</td> </tr> </tbody> </table> |
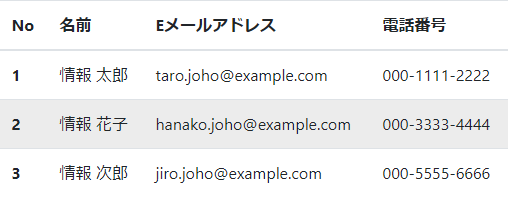
明細の2行目にマウスカーソルを合わせた状態。
セル内の余白(パディング)を狭くする
tableタグ(<table>)のclass属性に「table-sm」を指定すると、セルのパディング(padding)が指定しないときの半分になります。
|
1 2 3 4 5 6 7 8 9 10 11 12 13 14 15 16 17 18 19 20 21 22 23 24 25 26 27 28 29 30 31 |
<!-- セル内の余白を半分にする --> <table class="table table-sm"> <thead> <tr> <th scope="col">No</th> <th scope="col">名前</th> <th scope="col">Eメールアドレス</th> <th scope="col">電話番号</th> </tr> </thead> <tbody> <tr> <th scope="row">1</th> <td>情報 太郎</td> <td>taro.joho@example.com</td> <td>000-1111-2222</td> </tr> <tr> <th scope="row">2</th> <td>情報 花子</td> <td>hanako.joho@example.com</td> <td>000-3333-4444</td> </tr> <tr> <th scope="row">3</th> <td>情報 次郎</td> <td>jiro.joho@example.com</td> <td>000-5555-6666</td> </tr> </tbody> </table> |

行またはセルに色を設定する
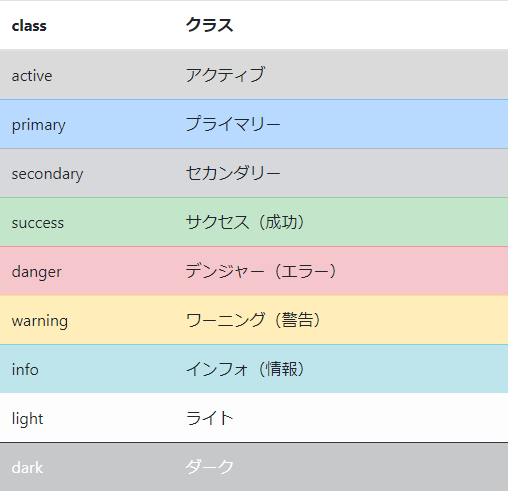
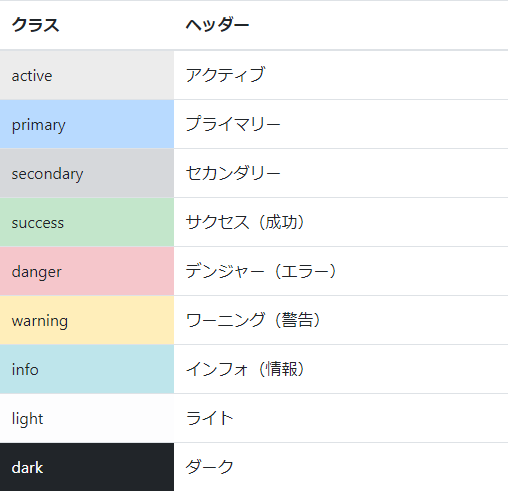
trタグ(<tr>)またはtdタグ(<td>)のclass属性に色を表すコンテキスト「table-active」などを指定すると、行またはセルの色を設定することができます。
|
1 2 3 4 5 6 7 8 9 10 11 12 13 14 15 16 17 18 19 20 21 22 23 24 25 26 27 28 29 30 31 32 33 34 35 36 37 38 39 40 41 42 43 44 45 46 47 |
<!-- 行に色を設定する --> <table class="table"> <thead> <tr> <th scope="col">class</th> <th scope="col">クラス</th> </tr> </thead> <tbody> <tr class="table-active"> <td>active</td> <td>アクティブ</td> </tr> <tr class="table-primary"> <td>primary</td> <td>プライマリー</td> </tr> <tr class="table-secondary"> <td>secondary</td> <td>セカンダリー</td> </tr> <tr class="table-success"> <td>success</td> <td>サクセス(成功)</td> </tr> <tr class="table-danger"> <td>danger</td> <td>デンジャー(エラー)</td> </tr> <tr class="table-warning"> <td>warning</td> <td>ワーニング(警告)</td> </tr> <tr class="table-info"> <td>info</td> <td>インフォ(情報)</td> </tr> <tr class="table-light"> <td>light</td> <td>ライト</td> </tr> <tr class="table-dark"> <td>dark</td> <td>ダーク</td> </tr> </tbody> </table> |
|
1 2 3 4 5 6 7 8 9 10 11 12 13 14 15 16 17 18 19 20 21 22 23 24 25 26 27 28 29 30 31 32 33 34 35 36 37 38 39 40 41 42 43 44 45 46 47 |
<!-- セルに色を設定する --> <table class="table"> <thead> <tr> <th scope="col">class</th> <th scope="col">クラス</th> </tr> </thead> <tbody> <tr> <td class="table-active">active</td> <td>アクティブ</td> </tr> <tr> <td class="table-primary">primary</td> <td>プライマリー</td> </tr> <tr> <td class="table-secondary">secondary</td> <td>セカンダリー</td> </tr> <tr> <td class="table-success">success</td> <td>サクセス(成功)</td> </tr> <tr> <td class="table-danger">danger</td> <td>デンジャー(エラー)</td> </tr> <tr> <td class="table-warning">warning</td> <td>ワーニング(警告)</td> </tr> <tr> <td class="table-info">info</td> <td>インフォ(情報)</td> </tr> <tr> <td class="table-light">light</td> <td>ライト</td> </tr> <tr> <td class="table-dark">dark</td> <td>ダーク</td> </tr> </tbody> </table> |
テーブルの見出し(キャプション)
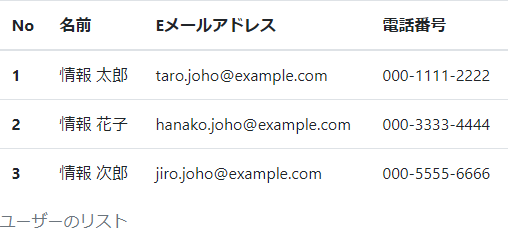
captionタグ(<caption>)を使用するとテーブルに見出し(キャプション)を付けることができます。
|
1 2 3 4 5 6 7 8 9 10 11 12 13 14 15 16 17 18 19 20 21 22 23 24 25 26 27 28 29 30 31 32 |
<!-- テーブルに見出しを付ける --> <table class="table"> <caption>ユーザーのリスト</caption> <thead> <tr> <th scope="col">No</th> <th scope="col">名前</th> <th scope="col">Eメールアドレス</th> <th scope="col">電話番号</th> </tr> </thead> <tbody> <tr> <th scope="row">1</th> <td>情報 太郎</td> <td>taro.joho@example.com</td> <td>000-1111-2222</td> </tr> <tr> <th scope="row">2</th> <td>情報 花子</td> <td>hanako.joho@example.com</td> <td>000-3333-4444</td> </tr> <tr> <th scope="row">3</th> <td>情報 次郎</td> <td>jiro.joho@example.com</td> <td>000-5555-6666</td> </tr> </tbody> </table> |
レスポンシブテーブル
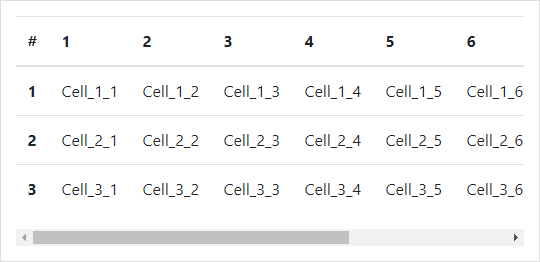
レスポンステーブルを使用すると、テーブルにスクロールバーを表示し、水平方向にスクロールさせることができます。
レスポンシブテーブルを指定する際は、tableタグ(<table>)をラップする要素を用意し、class属性に「table-responsive」を指定します。
ブラウザーの幅に対応したブレークポイントごとにレスポンシブテーブルを指定する場合は「table-responsive-sm」「table-responsive-md」「table-responsive-lg」「table-responsive-xl」を指定します。
(sm: Small, md: Medium, lg: Large, xl: Extra large)
常にスクロールする
|
1 2 3 4 5 6 7 8 9 10 11 12 13 14 15 16 17 18 19 20 21 22 23 24 25 26 27 28 29 30 31 32 33 34 35 36 37 38 39 40 41 42 43 44 45 46 47 48 49 50 51 52 53 54 55 56 57 |
<!-- 常にスクロール可能にする --> <div class="table-responsive"> <table class="table"> <thead> <tr> <th scope="col">#</th> <th scope="col">1</th> <th scope="col">2</th> <th scope="col">3</th> <th scope="col">4</th> <th scope="col">5</th> <th scope="col">6</th> <th scope="col">7</th> <th scope="col">8</th> <th scope="col">9</th> </tr> </thead> <tbody> <tr> <th scope="row">1</th> <td>Cell_1_1</td> <td>Cell_1_2</td> <td>Cell_1_3</td> <td>Cell_1_4</td> <td>Cell_1_5</td> <td>Cell_1_6</td> <td>Cell_1_7</td> <td>Cell_1_8</td> <td>Cell_1_9</td> </tr> <tr> <th scope="row">2</th> <td>Cell_2_1</td> <td>Cell_2_2</td> <td>Cell_2_3</td> <td>Cell_2_4</td> <td>Cell_2_5</td> <td>Cell_2_6</td> <td>Cell_2_7</td> <td>Cell_2_8</td> <td>Cell_2_9</td> </tr> <tr> <th scope="row">3</th> <td>Cell_3_1</td> <td>Cell_3_2</td> <td>Cell_3_3</td> <td>Cell_3_4</td> <td>Cell_3_5</td> <td>Cell_3_6</td> <td>Cell_3_7</td> <td>Cell_3_8</td> <td>Cell_3_9</td> </tr> </tbody> </table> </div> |
特定の幅(ブレークポイント)でスクロールする
|
1 2 3 4 5 6 7 8 9 10 11 12 13 14 15 16 17 18 19 20 21 22 23 24 25 26 27 28 29 30 31 32 33 34 35 36 37 38 39 40 41 42 43 44 45 46 47 48 49 50 51 52 53 54 55 56 57 |
<!-- 幅がSmall以下の場合にスクロール可能にする --> <div class="table-responsive-sm"> <table class="table"> <thead> <tr> <th scope="col">#</th> <th scope="col">1</th> <th scope="col">2</th> <th scope="col">3</th> <th scope="col">4</th> <th scope="col">5</th> <th scope="col">6</th> <th scope="col">7</th> <th scope="col">8</th> <th scope="col">9</th> </tr> </thead> <tbody> <tr> <th scope="row">1</th> <td>Cell_1_1</td> <td>Cell_1_2</td> <td>Cell_1_3</td> <td>Cell_1_4</td> <td>Cell_1_5</td> <td>Cell_1_6</td> <td>Cell_1_7</td> <td>Cell_1_8</td> <td>Cell_1_9</td> </tr> <tr> <th scope="row">2</th> <td>Cell_2_1</td> <td>Cell_2_2</td> <td>Cell_2_3</td> <td>Cell_2_4</td> <td>Cell_2_5</td> <td>Cell_2_6</td> <td>Cell_2_7</td> <td>Cell_2_8</td> <td>Cell_2_9</td> </tr> <tr> <th scope="row">3</th> <td>Cell_3_1</td> <td>Cell_3_2</td> <td>Cell_3_3</td> <td>Cell_3_4</td> <td>Cell_3_5</td> <td>Cell_3_6</td> <td>Cell_3_7</td> <td>Cell_3_8</td> <td>Cell_3_9</td> </tr> </tbody> </table> </div> |
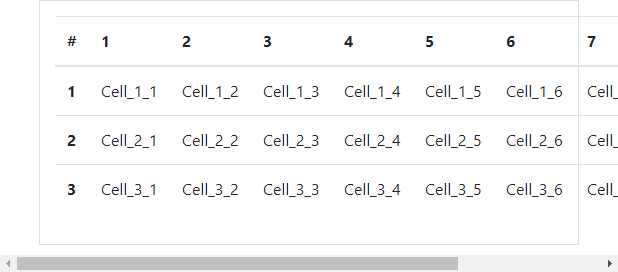
上記の例では「table-responsive-sm」を指定して、ブラウザーの幅がSmall以下の場合にのみスクロールするようにしているので、幅がMideum以上の場合はスクロールバーが表示されず、テーブルがブラウザーの幅をはみ出して表示されます。
まとめ
今回はBootstrapのテーブルの使い方をご紹介しました。
Bootstrapのテーブルの装飾は、様々な形式が用意されているので、独自のスタイル(CSS)を定義しなくても、すぐに見栄えの良いテーブルのスタイルが適用できます。
また、レスポンシブに対応するための定義も用意されているので、色々なデザインのWebサイトに柔軟に対応することができます。


