ユーザーの入力を受け付けるWebサイトやWebシステムでは、HTMLのフォームを配置します。
フォームに配置されるコントロールでは、テキストを入力するinput要素(<input type=”text” />)が最も多く使用されます。
Bulmaには、input要素で作成したテキストボックスを強化するためのクラスが用意されています。
今回は、テキストボックスを装飾するinputクラスを紹介します。
バリエーション豊富なテキスト入力を実現するinputクラス
inputクラスを使用すると、テキストボックスをスタイリッシュに描画できます。

HTML
|
1 |
<input class="input" type="text" placeholder="テキストを入力してください。"> |
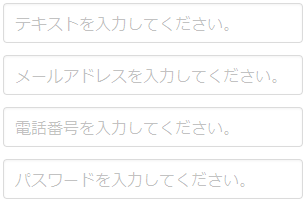
Bulmaのinputクラスは、以下の属性のinput要素をサポートしています。
- type=”text”
- type=”email”
- type=”tel”
- type=”password”
HTML
|
1 2 3 4 5 6 7 8 9 10 11 12 |
<div class="field"> <input class="input" type="text" placeholder="テキストを入力してください。"> </div> <div class="field"> <input class="input" type="email" placeholder="メールアドレスを入力してください。"> </div> <div class="field"> <input class="input" type="tel" placeholder="電話番号を入力してください。"> </div> <div class="field"> <input class="input" type="password" placeholder="パスワードを入力してください。"> </div> |
テキストボックスの色
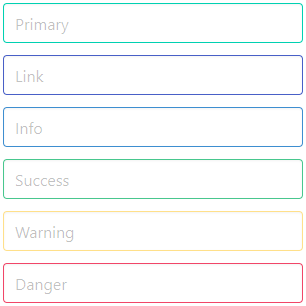
Bulmaのinputクラスを適用したテキストボックスでは、いくつかの色を指定することができます。
色の指定はBulmaに用意されているテーマカラーで行います。
テーマカラーには以下の6種類があります。
- Primary: プライマリー
- Link: リンク
- Info: 情報
- Success: 成功
- Warning: 警告
- Danger: 危険
テーマカラーを指定したテキストボックスは、次のように描画されます。
HTML
|
1 2 3 4 5 6 7 8 9 10 11 12 13 14 15 16 17 18 |
<div class="field"> <input class="input is-primary" type="text" placeholder="Primary"> </div> <div class="field"> <input class="input is-link" type="text" placeholder="Link"> </div> <div class="field"> <input class="input is-info" type="text" placeholder="Info"> </div> <div class="field"> <input class="input is-success" type="text" placeholder="Success"> </div> <div class="field"> <input class="input is-warning" type="text" placeholder="Warning"> </div> <div class="field"> <input class="input is-danger" type="text" placeholder="Danger"> </div> |
テキストボックスのサイズ
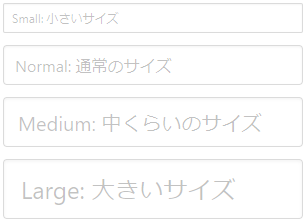
Bulmaではクラスを指定するだけで、テキストボックスのサイズ(文字サイズ)を変更することができます。
テキストボックスに設定できるサイズは、以下の4種類が用意されています。
- Small: 小さい
- Normal: 通常
- Medium: 中くらい
- Large: 大きい
サイズを指定したテキストボックスは、次のように描画されます。
HTML
|
1 2 3 4 5 6 7 8 9 10 11 12 |
<div class="field"> <input class="input is-small" type="text" placeholder="Small: 小さいサイズ"> </div> <div class="field"> <input class="input is-normal" type="text" placeholder="Normal: 通常のサイズ"> </div> <div class="field"> <input class="input is-medium" type="text" placeholder="Medium: 中くらいのサイズ"> </div> <div class="field"> <input class="input is-large" type="text" placeholder="Large: 大きいサイズ"> </div> |
サイズを指定しない場合(省略した場合)は、通常のサイズ(is-normalを指定した時と同じサイズ)になります。
フレームが丸いテキストボックス
Bulmaではbuttonクラスを指定したボタンやtagクラスを指定したタグラベルと同様に、テキストボックスを丸く描画することができます。

HTML
|
1 |
<input class="input is-rounded" type="text" placeholder="丸いテキストボックス"> |
フレームを丸めたテキストボックスは、ボタンやタグと同様にis-roundedクラスで指定します。
状態によるテキストボックスのスタイル
テキストボックスのスタイルは、ボタンと同様に状態によって変化させることができます。
状態には
- ホバー
- フォーカス
- ローディング(読み込み中)
の3種類が指定できます。
ホバー状態のテキストボックス

HTML
|
1 2 3 |
<div class="control"> <input class="input is-hovered" type="text" placeholder="ホバー状態のテキストボックス"> </div> |
ホバー状態は、is-hoveredクラスで指定します。
フォーカス状態のテキストボックス

HTML
|
1 2 3 |
<div class="control"> <input class="input is-focused" type="text" placeholder="フォーカス状態のテキストボックス"> </div> |
フォーカス状態は、is-focusedクラスで指定します。
ローディング(読み込み中)状態のテキストボックス

HTML
|
1 2 3 |
<div class="control is-loading"> <input class="input" type="text" placeholder="ローディング中のテキストボックス"> </div> |
ローディング状態は、is-loadingクラスで指定します。
is-loadingクラスは、input要素のclass属性ではなく、親となる要素(controlクラスを指定した要素)のclass属性に指定します。
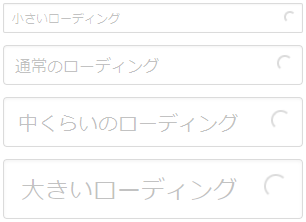
テキストボックスのサイズを変更している場合に、ローディングスピナーのサイズをテキストボックスのサイズに合わせるには、テキストボックス(input要素)のコンテナ(controlクラスを指定した親要素)にテキストボックスのサイズに対応したクラスを指定します。
HTML
|
1 2 3 4 5 6 7 8 9 10 11 12 13 14 15 16 17 18 19 20 |
<div class="field"> <div class="control is-small is-loading"> <input class="input is-small" type="text" placeholder="小さいローディング"> </div> </div> <div class="field"> <div class="control is-loading"> <input class="input" type="text" placeholder="通常のローディング"> </div> </div> <div class="field"> <div class="control is-medium is-loading"> <input class="input is-medium" type="text" placeholder="中くらいのローディング"> </div> </div> <div class="field"> <div class="control is-large is-loading"> <input class="input is-large" type="text" placeholder="大きいローディング"> </div> </div> |
小さいテキストボックスの場合には、is-smallクラス
中くらいのテキストボックスの場合には、is-mediumクラス
大きいテキストボックスの場合には、is-largeクラス
を指定します。
無効状態(disabled属性)を指定したテキストボックス
Bulmaのクラスの指定ではありませんが、HTMLのdisabled属性を指定して無効状態にしたテキストボックスは、以下のように描画されます。

HTML
|
1 |
<input class="input" type="text" placeholder="無効状態のテキストボックス" disabled> |
読み取り専用状態(readonly属性)を指定したテキストボックス
HTMLのreadonly属性を指定して読み取り専用状態にしたテキストボックスは、通常状態のテキストボックスとほとんど同じように描画されますが、影の描画がなくなります。

HTML
|
1 2 3 4 5 6 7 8 9 10 |
<div class="field"> <div class="control"> <input class="input" type="text" value="通常のテキストボックス"> </div> </div> <div class="field"> <div class="control"> <input class="input" type="text" value="読み取り専用のテキストボックス" readonly> </div> </div> |
テキストボックスをラベルのように描画する
Bulmaでは、テキストボックスをラベルのように静的テキストとして描画することができます。
静的テキストとして描画したテキストボックスでは、readonly属性を指定した時と同様にテキストの選択(コピー)はできますが変更はできません。
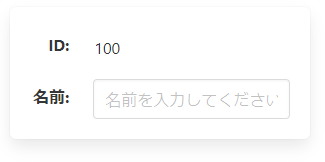
静的テキストボックスとして描画した場合は、テキストボックスのフレーム(枠線や影)や背景と左右の余白がなくなります。

HTML
|
1 |
<input class="input is-static" type="text" value="静的テキストボックス"> |
静的なテキストボックスには、is-staticクラスを指定します。
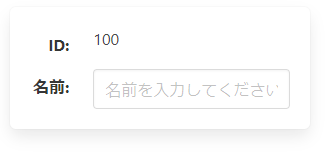
静的なテキストボックスでは、上下の余白が維持されるため、プレーンなテキストを配置した場合と比べると、描画される位置が異なります。
静的テキストボックスを使わない場合
静的テキストボックスを使った場合
FontAwesomeのアイコン付きテキストボックス
Bulmaのテキストボックスでは、ボックスの内部にFont Awesomeのアイコンを表示することができます。
アイコンはテキストボックスの左端と右端のいずれか、または両方に配置することができます。

HTML
|
1 2 3 4 5 6 7 8 9 10 11 12 13 14 15 16 17 18 19 |
<div class="field"> <p class="control has-icons-left"> <input class="input" type="text" placeholder="アカウントID"> <span class="icon is-small is-left"> <i class="fas fa-user"></i> </span> </p> </div> <div class="field"> <p class="control has-icons-left has-icons-right"> <input class="input" type="password" placeholder="パスワード"> <span class="icon is-small is-left"> <i class="fas fa-lock"></i> </span> <span class="icon is-small is-right"> <i class="far fa-eye"></i> </span> </p> </div> |
アイコンを表示する際は
まずテキストボックスの親要素にcontrolクラスを指定します。
テキストボックスの左端にアイコンを配置する場合は、親要素のクラスにhas-icons-leftクラスを追加で指定します。右端にアイコンを配置する場合は、has-icons-rightクラスを同様に指定します。
左端のみに配置
|
1 2 3 |
<p class="control has-icons-left"> <!-- ここにテキストボックスとアイコンを配置 --> </p> |
右端のみに配置
|
1 2 3 |
<p class="control has-icons-right"> <!-- ここにテキストボックスとアイコンを配置 --> </p> |
左端と右端の両方に配置
|
1 2 3 |
<p class="control has-icons-left has-icons-right"> <!-- ここにテキストボックスとアイコンを配置 --> </p> |
次にテキストボックスを配置します。
|
1 |
<input class="input" type="text" placeholder="入力テキスト"> |
最後にアイコンを配置します。
iconクラスを指定したアイコンをラップするspan要素にis-leftクラスを指定すると左端に表示され、is-rightクラスを指定すると右端に表示されます。
左端に配置
|
1 2 3 |
<span class="icon is-small is-left"> <!-- ここにアイコン要素を配置 --> </span> |
右端に配置
|
1 2 3 |
<span class="icon is-small is-right"> <!-- ここにアイコン要素を配置 --> </span> |
Font Awesomeの利用
Font Awesomeのアイコンを利用する際は、スタイルの参照が必要になります。
|
1 |
<link rel="stylesheet" href="https://use.fontawesome.com/releases/v5.10.0/css/all.css"> |
Font Awesomeのアイコンにはフリー(無償)のものと、有料のものがあります。
フリーで使用できるFont Awesomeのアイコンは、以下の記事でご紹介しています。
